1. Overview
Project mod_cluster is an intelligent load balancer. Like mod_jk and mod_proxy, mod_cluster uses a communication channel to forward requests from httpd to one of a set of application server nodes. Unlike mod_jk and mod_proxy, mod_proxy_cluster leverages an additional connection between the application server nodes and httpd. The application server nodes use this connection to transmit server-side load balance factors and lifecycle events back to httpd via a custom set of HTTP methods, affectionately called the Mod-Cluster Management Protocol (MCMP). This additional feedback channel allows mod_proxy_cluster to offer a level of intelligence and granularity not found in other load balancing solutions.
Within httpd, mod_proxy_cluster is implemented as a set of modules for httpd with mod_proxy enabled. Much of the logic comes from mod_proxy, e.g. mod_proxy_ajp provides all the AJP logic needed by mod_proxy_cluster.
| In the past, mod_proxy_cluster was named mod_cluster (version 1.3.x and older), consisting of native and container implementations. The repositories of the two implementations were separated, and the native part got the name mod_proxy_cluster, while the former name mod_cluster is currently used for container implementation. |
1.1. Support Matrix
1.1.1. Container Integration Modules
| Release | Tomcat versions | Java SE | Code | Documentation |
|---|---|---|---|---|
|
|
17 |
||
|
|
11 |
||
|
|
8 |
1.1.2. Apache HTTP modules
| Release | httpd versions | Code | Documentation |
|---|---|---|---|
|
2.4.53 and newer |
||
|
2.4.49 and newer |
Complete documentation for legacy versions is archived at https://docs.modcluster.io/legacy/.
1.2. Platforms
The binary packages of the modules needed to use with Apache httpd server are present in most distributions.
If your distribution doesn’t provide mod_proxy_cluster, pick the latest version from the source and follow the building instructions.
1.3. Advantages
mod_proxy_cluster boasts the following advantages over other httpd-based load balancers:
-
Dynamic configuration of httpd workers
Traditional httpd-based load balancers require explicit configuration of the workers available to a proxy. In mod_proxy_cluster, the bulk of the proxy’s configuration resides on the application servers. The set of proxies to which an application server will communicate is determined either by a static list or using dynamic discovery via the advertising mechanism. The application server relays lifecycle events (e.g. server startup/shutdown) to the proxies allowing them to effectively autoconfigure themselves. Notably, the graceful shutdown of a server will not result in a failover response by a proxy, as is the case with traditional httpd-based load balancers.
-
Server-side load balance factor calculation
In contrast with traditional httpd-based load balancers, mod_proxy_cluster uses load balance factors calculated and provided by the application servers rather than computing these in the proxy. Consequently, mod_proxy_cluster offers a more robust and accurate set of load metrics than is available from the proxy (see Load Metrics for more).
-
Fine-grained web-app lifecycle control
Traditional httpd-based load balancers do not handle web application undeployments particularly well. From the proxy’s perspective, requests to an undeployed web application are indistinguishable from a request for a non-existent resource and will result in 404 errors. In mod_cluster, each server forwards any web application context lifecycle events (e.g. web-app deploy/undeploy) to the proxy, informing it to start/stop routing requests for a given context to that server.
-
AJP is optional
Unlike mod_jk, mod_proxy_cluster does not require AJP. httpd connections to application server nodes can use HTTP, HTTPS, or AJP. The original concepts are described in a Design article.
1.4. Requirements
1.4.1. Balancer side
-
Apache HTTP Server 2.4.53 and newer for mod_proxy_cluster 2.x
-
Apache HTTP Server 2.4.49 and newer for mod_proxy_cluster/mod_cluster 1.3.x
1.4.2. Worker side
The mod_cluster container integration module (implemented in Java) is provided for all the following containers:
-
WildFly 8 and newer
-
JBoss AS 7
-
Tomcat 6 and newer
1.5. Limitations
mod_proxy_cluster uses shared memory to keep the nodes description, the shared memory is created at the start of httpd and the structure of each item is fixed. The following cannot be changed by configuration directives.
-
Max Alias length 255 characters in 2.x, 100 characters in 1.3.x (Host: hostname header, Alias in<Host/>).
-
Max context length 80 (for example myapp.war deploys in /myapp/myapp is the context).
-
Max balancer name length 40 (balancer property in mbean).
-
Max JVMRoute string length is PROXY_WORKER_MAX_ROUTE_SIZE characters in 2.x, 64 characters in 1.3.x (JVMRoute in <Engine/>).
-
Max load balancing group name length 20 (domain property in mbean).
-
Max hostname length for a node 64 (address in the <Connector/>).
-
Max port length for a node 7 (8009 is 4 characters, port in the <Connector/>).
-
Max scheme length for a node 16 (possible values are http, https, ajp, liked with the protocol of <Connector/>).
-
Max cookie name 30 (the header cookie name for sessionid default value:
JSESSIONIDfromorg.apache.catalina.Globals.SESSION_COOKIE_NAME). -
Max path name 30 (the parameter name for the sessionid default value:
jsessionidfromorg.apache.catalina.Globals.SESSION_PARAMETER_NAME). -
Max length for a sessionid 120 (something like BE81FAA969BF64C8EC2B6600457EAAAA.node01).
1.6. Downloads
Download the latest mod_cluster release.
The release contains the source to build the WildFly/JBoss AS/Tomcat Java distributions
The native part is developed in https://github.com/modcluster/mod_proxy_cluster (with 1.3.x version and older available in the original repository https://github.com/modcluster/mod_cluster/tree/1.3.x). The native part is compatible with the 2.0.x and 1.4.x branches of mod_cluster
Alternatively, you can build from source using the mod_cluster git repository and mod_proxy_cluster git repository.
1.7. Configuration
If you want to skip the details and just set up a minimal working installation of mod_cluster, see the Quick Start Guide.
1.8. Migration from mod_jk or mod_proxy
Migrating from mod_jk or mod_proxy is fairly straightforward. In general, much of the configuration previously
found in httpd.conf is now defined in the application server worker nodes.
1.9. SSL support
Both the request connections between httpd and the application server nodes, and the feedback channel between the nodes and httpd can be secured. The former is achieved via the mod_proxy_https module and a corresponding ssl-enabled HTTP connector in JBoss Web or Undertow. The latter requires the mod_ssl module and explicit configuration in WildFly/JBoss AS/Web/Undertow.
mod_cluster contains mod_ssl, therefore the warning (copied from OpenSSL website).
| Strong cryptography: Please remember that export/import and/or use of strong cryptography software, providing cryptography hooks, or even just communicating technical details about cryptography software is illegal in some parts of the world. So when you import this package to your country, re-distribute it from there or even just email technical suggestions or even source patches to the authors or other people you are strongly advised to pay close attention to any laws or regulations which apply to you. The authors of openssl are not liable for any violations you make here. So be careful, it is your responsibility. |
2. Quick Start Guide
Following are the steps to set up a minimal working installation of mod_cluster on a single httpd server and a single back end server, either JBoss AS, JBossWeb, Undertow or Tomcat. The steps can be repeated to add as many httpd servers or back end servers to your cluster as desired.
The steps shown here are not intended to demonstrate how to set up a production install of mod_proxy_cluster; for example, using SSL to secure access to the httpd-side mod_manager component is not covered. See the balancer-side and worker-side configuration documentation for the full set of configuration options.
2.1. Download mod_cluster components
Download the latest httpd and java release bundles. If there is no pre-built httpd bundle appropriate for your OS or system architecture, you can build the Apache httpd binary from the source.
2.2. Install the httpd binary
2.2.1. Install the whole httpd
Most of the standard distributions contain Apache httpd server. Use your platform’s specific install tools to install. For example, in Fedora, just install as a root:
dnf install httpd2.2.2. Install only the mod_cluster modules
If you already have a working httpd install that you would prefer to use and your distribution contains mod_cluster/mod_proxy_cluster just install it:
dnf install mod_clusterAnd then you have the files below in your module directory:
-
mod_manager.so
-
mod_proxy_cluster.so
-
mod_advertise.so
-
mod_cluster_slotmem.so (only 1.3.x version)
httpd version mismatch: [warn] httpd version mismatch detected Please,
beware that one cannot simply load the aforementioned modules into an arbitrary
httpd installation. These modules were built with a particular minor httpd
version, and they cannot be used with an older one.
2.2.3. Install in Windows
Unzip the bundle corresponding to your architecture.
Change to the bin directory of the subfolder Apache24 where you unzipped the bundle.
You may run httpd directly by using:
httpd.exeor install Apache HTTP Server as a service:
httpd.exe -k install -n myApacheand start the service via net start or using httpd.exe:
net start myApacheor
httpd.exe -k start2.3. Configure httpd
httpd.conf might need to be configured to use mod_proxy_cluster.
LoadModule proxy_module         modules/mod_proxy.so
LoadModule proxy_http_module    modules/mod_proxy_http.so
LoadModule proxy_ajp_module     modules/mod_proxy_ajp.so
LoadModule manager_module       modules/mod_manager.so
LoadModule proxy_cluster_module modules/mod_proxy_cluster.so
LoadModule advertise_module     modules/mod_advertise.so
LoadModule watchdog_module      modules/mod_watchdog.so
LoadModule slotmem_shm_module   modules/mod_slotmem_shm.so

<IfModule manager_module>
  Listen 127.0.0.1:8090
  ManagerBalancerName mycluster
  <VirtualHost 127.0.0.1:8090>
    <Location />
     Require ip 127.0.0
    </Location>

    EnableMCMPReceive
    <Location /mod_cluster_manager>
       SetHandler mod_cluster-manager
       Require ip 127.0.0
    </Location>

  </VirtualHost>
</IfModule>
For mod_proxy_cluster/mod_cluster 1.3.x you must load mod_cluster_slotmem module instead
of the httpd’s one. Simply change the line with slotmem_shm_module to following:
LoadModule cluster_slotmem_module modules/mod_cluster_slotmem.so2.4. Install the worker-side binaries
Build the jar file using maven
mvn installYour next step depends on whether your target server is JBoss AS 7.x, Tomcat 8, 8.5/9.0 or 10.x or WildFly (Undertow).
2.4.1. Installing in Tomcat
Assuming $CATALINA_HOME indicates the root of your Tomcat install:
cp container/tomcat-[8.5,9.0,10.1]/target/*.jar $CATALINA_HOME/lib/
cp container/spi/target/*.jar $CATALINA_HOME/lib/
cp load-spi/target/*.jar $CATALINA_HOME/lib/
cp core/target/*.jar $CATALINA_HOME/lib/
cp dist/target/dependency/jboss-logging* $CATALINA_HOME/lib/
Note that you should copy only the tomcat files corresponding to your tomcat installation.
-
tomcat-8.5 for tomcat 8.5.x
-
tomcat-9.0 for tomcat 9.0.x
-
tomcat-10.1 for tomcat 10.0.x and 10.1.x
2.4.2. Installing in WildFly
WildFly already includes mod_cluster integration so no extra installation steps are necessary. The mod_cluster subsystem is pre-configured in the HA configurations. For WildFly-specific configuration refer to WildFly documentation.
2.5. Configuring the server-side
2.5.1. Configuring mod_cluster with JBoss AS 5.x+
No post-installation configuration necessary!
2.5.2. Configuring mod_cluster with standalone JBoss Web or Tomcat
Edit the $CATALINA_HOME/conf/server.xml file, adding the following next to the other <Listener/> elements:
<Listener className="org.jboss.modcluster.container.catalina.standalone.ModClusterListener" proxyList="127.0.0.1:8090"/>2.5.4. Start the back-end server
Starting JBoss AS
cd $JBOSS_HOME/bin
./run.sh -c all
Starting JBossWeb or Tomcat
cd $CATALINA_HOME
./startup.sh
Set up more back-end servers
Repeat the back-end server install and configuration steps for each server in your cluster.
3. Container Integration Configuration
3.1. JBoss AS
mod_cluster is supported in AS7 via the modcluster subsystem See AS7 modcluster subsystem Configuration.
In JBoss AS 6 and older version mod_cluster’s configuration resides within the following file:
$JBOSS_HOME/server/$PROFILE/deploy/mod_cluster.sar/META-INF/mod_cluster-jboss-beans.xml
The entry point for mod_cluster’s server-side configuration is the ModClusterListener bean, which delegates web container
(e.g. JBoss Web) specific events to a container agnostic event handler.
In general, the ModClusterListener bean defines:
-
A
ContainerEventHandlerin which to handle events from the web container. -
A reference to the JBoss mbean server.
e.g.
<bean name="ModClusterListener" class="org.jboss.modcluster.container.jbossweb.JBossWebEventHandlerAdapter">
  <constructor>
    <parameter class="org.jboss.modcluster.container.ContainerEventHandler">
      <inject bean="ModClusterService"/>
    </parameter>
    <parameter class="javax.management.MBeanServer">
      <inject bean="JMXKernel" property="mbeanServer"/>
    </parameter>
  </constructor>
</bean>
3.1.1. Configuration Properties
The ModClusterConfig bean enumerates the configuration properties used by mod_cluster.
For the complete list of configuration properties and their default values, see the chapter entitled
Server-side Configuration Properties.
e.g.
<bean name="ModClusterConfig" class="org.jboss.modcluster.config.ModClusterConfig" mode="On Demand">
  <!-- Specify configuration properties here -->
</bean>
3.1.2. Tomcat connector
Like mod_jk and mod_proxy_balancer, mod_cluster requires a connector in your server.xml to which to forward web requests. Unlike mod_jk and mod_proxy_balancer, mod_cluster is not confined to AJP, but can use HTTP as well. While AJP is generally faster, an HTTP connector can optionally be secured via SSL.
Since mod_cluster 1.4, the connector registered with the balancer is no longer automatically chosen by mod_cluster and needs to be specified explicitly.
The new attributes connectorPort and/or connectorAddress need to be configured explicitly matching exactly one of the configured connectors, e.g.:
<Listener className="org.jboss.modcluster.container.tomcat.ModClusterListener" connectorPort="8009"/>In mod_cluster version 1.3 and older, if multiple possible connectors are defined in your server.xml, mod_cluster uses the following algorithm to choose between them:
-
If an native (APR) AJP connector is available, use it.
-
If an AJP connector is available, use it.
-
Otherwise, choose the HTTP connector with the highest max threads.
In case you are using portOffset on any connector you want to register with balancer, set connectorPort to the value of its port attribute.
Since 2.0.4.Final, the mod_cluster will handle the offset on its own.
|
3.1.3. Node Identity
Like mod_jk and mod_proxy_balancer, mod_cluster identifies each node via a unique jvm route. By default, mod_cluster uses the following algorithm to assign the jvm route for a given node:
-
Use the value from
server.xml,<Engine jvmRoute="…"/>, if defined. -
Generate a jvm route using the configured TODO. The default implementation does the following:
-
Use the value of the
jboss.mod_cluster.jvmRoutesystem property, if defined. -
Generate a UUID.
While UUIDs are ideal for production systems, in a development or testing environment, it is useful to know which node served
a given request just by looking at the jvm route. In this case, you can utilize the org.jboss.modcluster.SimpleJvmRouteFactory.
The factory generates jvm routes of the form:
bind-address:*port*:*engine-name*
3.2. JBoss Web & Tomcat
mod_cluster’s entire configuration for JBoss Web or Tomcat resides entirely within $CATALINA_HOME/conf/server.xml.
This limits the adds the following constraints to mod_cluster’s feature set:
-
Only non-clustered mode is supported
-
Only a single load metric can be used to calculate the load factor.
3.2.1. Lifecycle Listener
The entry point for JBoss Web and Tomcat configuration is the ModClusterListener.
All mod_cluster configuration properties are defined as
attributes of the <Listener/> element. For the complete list of configuration properties and their default values, see
the chapter entitled "Server-side Configuration Properties".
e.g.
<Listener className="org.jboss.modcluster.container.catalina.standalone.ModClusterListener" advertise="true"/>3.2.2. Additional Tomcat dependencies
mod_cluster uses jboss-logging, which exists in JBoss Web, but not in Tomcat. Consequently, to use mod_cluster with Tomcat,
it is necessary to add jboss-logging-spi.jar
to $CATALINA_HOME/lib.
3.3. AS7 modcluster subsystem Configuration
JBoss Application Server 7+ mod_cluster subsystem configuration.
3.3.1. ModCluster Subsystem in JBoss AS7
The mod_cluster integration is done via the modcluster subsystem.
3.3.2. ModCluster Subsystem minimal configuration
The minimal configuration is having the modcluster schemaLocation in the schemaLocation list:
<extension module="org.jboss.as.modcluster"/>and subsystem declaration like:
<subsystem xmlns="urn:jboss:domain:modcluster:2.0"/>With that configuration modcluster will listen for advertise on 224.0.1.105:23364.
3.4. ModCluster Subsystem configuration
3.4.2. Proxy Discovery Configuration
| Attribute | Property | Default |
|---|---|---|
proxy-list |
proxyList |
none |
proxy-url |
proxyURL |
none |
advertise |
advertise |
true |
advertise-security-key |
advertiseSecurityKey |
none |
excluded-contexts |
excludedContexts |
none |
auto-enable-contexts |
autoEnableContexts |
true |
stop-context-timeout |
stopContextTimeout |
10 (in seconds) |
socket-timeout |
nodeTimeout |
20 (in seconds) |
3.4.3. Proxy Configuration
| Attribute | Property | Default |
|---|---|---|
sticky-session |
stickySession |
true |
sticky-session-remove |
stickySessionRemove |
false |
sticky-session-force |
stickySessionForce |
false |
node-timeout |
workerTimeout |
-1 |
max-attempts |
maxAttempts |
1 |
flush-packets |
flushPackets |
false |
flush-wait |
flushWait |
-1 |
ping |
ping |
10 |
smax |
smax |
-1 (it uses default value) |
ttl |
ttl |
-1 (it uses default value) |
domain |
loadBalancingGroup |
none |
load-balancing-group |
loadBalancingGroup |
none |
3.4.5. simple-load-provider Attributes
The simple load provider always sends the same load factor. Its purpose is testing, experiments and special scenarios such as hot stand-by.
<subsystem xmlns="urn:jboss:domain:modcluster:1.0">
  <mod-cluster-config>
    <simple-load-provider factor="1"/>
  </mod-cluster-config>
</subsystem>| Attribute | Property | Default |
|---|---|---|
factor |
LoadBalancerFactor |
1 |
3.4.6. dynamic-load-provider Attributes
The dynamic load provide allows to have load-metric as well as custom-load-metric defined. For example:
<subsystem xmlns="urn:jboss:domain:modcluster:1.0">
  <mod-cluster-config advertise-socket="mod_cluster">
    <dynamic-load-provider history="10" decay="2" initial-load="50">
       <load-metric type="cpu" weight="2" capacity="1"/>
       <load-metric type="sessions" weight="1" capacity="512"/>
       <custom-load-metric class="mypackage.myclass" weight="1" capacity="512">
          <property name="myproperty" value="myvalue" />
          <property name="otherproperty" value="othervalue" />
       </custom-load-metric>
    </dynamic-load-provider>
  </mod-cluster-config>
</subsystem>| Attribute | Property | Default |
|---|---|---|
history |
history |
512 |
decay |
decayFactor |
512 |
initialLoad |
initialLoad |
0 |
3.4.7. load-metric Configuration
The load-metric are the "classes" collecting information to allow computation of the load factor sent to httpd.
| Attribute | Property | Default |
|---|---|---|
type |
A Server-Side Load Metric |
mandatory |
weight |
weight |
9 |
capacity |
capacity |
512 |
3.4.8. Built-in Load Metric Types
| Type | Corresponding Server-Side Load Metric |
|---|---|
cpu |
|
heap |
|
sessions |
|
requests |
|
send-traffic |
|
receive-traffic |
|
busyness |
|
connection-pool |
The mem (SystemMemoryUsage) load metric has been removed since version 1.3, see MODCLUSTER-288 for more context.
|
3.4.9. custom-load-metric Configuration
The custom-load-metric are for user defined "classes" collecting information.
They are like the load-metric except type is replaced by class:
| Attribute | Property | Default |
|---|---|---|
class |
Name of your class |
Mandatory |
See an Example Custom Load Metric that reads load from a local file.
3.4.10. load-metric Configuration with the JBoss AS7 CLI
The load-metric have 4 commands to add and remove metrics
-
add-metric: Allows to add a
load-metricto thedynamic-load-provider, e.g../:add-metric(type=cpu, weight=2, capacity=1)
-
remove-metric: Allows to remove a
load-metricfrom thedynamic-load-provider, e.g../:remove-metric(type=cpu)
-
add-custom-metric: Allows to add a
load-custom-metricto the dynamic-load-provider, e.g../:add-custom-metric(class=myclass, weight=2, capacity=1, property=[("pool" => "mypool"), ("var" => "myvariable")]) -
remove-custom-metric: Allows to remove a
load-custom-metricfrom the dynamic-load-provider, e.g../:remove-custom-metric(class=myclass)
3.5. Building worker-side Components
3.5.1. Requirements
Building mod_cluster’s worker-side components from source requires the following tools:
-
JDK 5.0+
-
Maven 2.0+
3.5.2. Building
Steps to build:
-
Download the mod_cluster sources
git clone git://github.com/modcluster/mod_cluster.git
-
Use maven "dist" profile to build:
cd mod_cluster
mvn -P dist package
| Some unit tests require UDP port 23365. Make sure your local firewall allows the port. |
3.5.3. Built Artifacts
The build produces the following output in the target directory:
-
mod-cluster.sar Exploded format sar to copy to the deploy dir in your JBoss AS install.
-
JBossWeb-Tomcat/lib directory Jar files to copy to the lib directory in your JBossWeb or Tomcat install to support use of mod_cluster.
-
demo directory The load balancing demo application.
-
mod-cluster-XXX.tar.gz The full distribution tarball; includes the aforementioned elements.
3.5.4. worker-side Configuration Properties
The tables below enumerate the configuration properties available to an application server node. The location for these properties depends on how mod_cluster is configured.
Proxy Discovery Configuration
The list of proxies from which an application expects to receive AJP connections is either defined statically, via the addresses defined in the proxyList configuration property; or discovered dynamically via the advertise mechanism. Using a special mod_advertise module, proxies can advertise their existence by periodically broadcasting a multicast message containing their address:port. This functionality is enabled via the advertise configuration property. If configured to listen, a server can learn of the proxy’s existence, then notify that proxy of its own existence, and update its configuration accordingly. This frees both the proxy and the server from having to define static, environment-specific configuration values.
Session draining strategy
| Tomcat attribute | AS7/WildFly attribute | Default | Location | Scope | |
|---|---|---|---|---|---|
sessionDrainingStrategy |
session-draining-strategy |
|
Worker |
Worker |
Indicates the session draining strategy used during undeployment of a web application. There are three possible values:
-
DEFAULT: Drain sessions before web application undeploy only if the web application is non-distributable. -
ALWAYS: Always drain sessions before web application undeploy, even for distributable web applications. -
NEVER: Do not drain sessions before web application undeploy, even for non-distributable web application.
Proxies
| Tomcat attribute | AS7 attribute | WildFly attribute | Default | Location | Scope | |
|---|---|---|---|---|---|---|
proxyList |
proxy-list |
proxies |
None |
Worker |
Worker |
-
Tomcat/AS7: Defines a comma delimited list of httpd proxies with which this node will initially communicate. Value should be of the form: address1:*port1*,address2:*port2*. Using the default configuration, this property can by manipulated via the jboss.mod_cluster.proxyList system property.
-
WildFly: In WildFly, the
proxy-listattribute of the modcluster subsystem element is deprecated. Instead, one uses an output socket binding. The following example leveragesjboss-cli.sh, e.g. : -
Add a socket binding:
/socket-binding-group=standard-sockets/remote-destination-outbound-socket-binding=my-proxies:add(host=10.10.10.11, port=3333) -
Add the socket binding to the modcluster subsystem:
/subsystem=modcluster/mod-cluster-config=configuration:write-attribute(name=proxies, value="my-proxies")
Excluded contexts
| Tomcat attribute | AS7/WildFly attribute | WildFly Default | Tomcat/AS7 Default | Location | Scope | |
|---|---|---|---|---|---|---|
excludedContexts |
excluded-contexts |
None |
ROOT, admin-console, invoker, bossws, jmx-console, juddi, web-console |
Worker |
Worker |
List of contexts to exclude from httpd registration, of the form: host1:*context1*,host2:*context2*,host3:*context3* If no host is indicated, it is assumed to be the default host of the server (e.g. localhost). "ROOT" indicates the root context. Using the default configuration, this property can by manipulated via the jboss.mod_cluster.excludedContexts system property.
Auto Enable Contexts
| Tomcat attribute | AS7/WildFly attribute | Default | Location | Scope | |
|---|---|---|---|---|---|
autoEnableContexts |
auto-enable-contexts |
true |
Worker |
Worker |
If false the contexts are registered disabled in httpd, they need to be enabled via the enable() mbean method, jboss-cli command or via mod_cluster-manager web console on Apache HTTP Server.
Stop context timeout
| Tomcat attribute | AS7/WildFly attribute | Default | Location | Scope | |
|---|---|---|---|---|---|
stopContextTimeout |
stop-context-timeout |
10 s |
Worker |
Worker |
The amount of time in seconds for which to wait for a clean shutdown of a context (completion of pending requests for a distributable context; or destruction/expiration of active sessions for a non-distributable context).
Stop context timeout unit
| Tomcat attribute | AS7/WildFly attribute | Default | Location | Scope | |
|---|---|---|---|---|---|
stopContextTimeoutUnit |
None |
TimeUnit.SECONDS |
Worker |
Worker |
Tomcat allows for configuring an arbitrary TimeUnit for Stop context timeout
Proxy URL
| Tomcat attribute | AS7/WildFly attribute | Default | Location | Scope | |
|---|---|---|---|---|---|
proxyURL |
proxy-url |
/ |
Worker |
Balancer |
If defined, this value will be prepended to the URL of MCMP commands.
Socket timeout
| Tomcat attribute | AS7/WildFly attribute | Default | Location | Scope | |
|---|---|---|---|---|---|
socketTimeout |
socket-timeout |
20 s |
Worker |
Worker |
How long to wait for a response from an httpd proxy to MCMP commands before timing out, and flagging the proxy as in error.
Advertise
| Tomcat/AS7/WildFly attribute | Default | Location | Scope | |
|---|---|---|---|---|
advertise |
true, if proxyList is undefined, false otherwise |
Worker |
Worker |
If enabled, httpd proxies will be auto-discovered via receiving multicast announcements. This can be used either in concert or in place of a static proxies.
Advertise socket group
| Tomcat attribute | AS7/WildFly attribute | Default | Location | Scope | |
|---|---|---|---|---|---|
advertiseGroupAddress |
advertise-socket |
224.0.1.105 |
Worker |
Worker |
|
advertisePort |
in advertise-socket |
23364 |
Worker |
Worker |
UDP multicast address:port on which to listen for httpd proxy multicast advertisements. Beware of the actual interface your balancer/worker sends to/receives from. See MODCLUSTER-487 for Apache HTTP Server behaviour and MODCLUSTER-495 for Tomcat’s caveat.
Advertise security key
| Tomcat attribute | AS7/WildFly attribute | Default | Location | Scope |
|---|---|---|---|---|
advertiseSecurityKey |
advertise-security-key |
None |
Worker |
Balancer |
If specified, httpd proxy advertisements checksums (using this value as a salt) will be required to be verified on the server side. This option does not secure your installation, it does not replace proper SSL configuration. It merely ensures that only certain workers can talk to certain balancers. Beware of MODCLUSTER-446.
Advertise thread factory
| Tomcat attribute | AS7/WildFly attribute | Default | Location | Scope |
|---|---|---|---|---|
advertiseThreadFactory |
None |
Executors.defaultThreadFactory() |
Worker |
Worker |
The thread factory used to create the background advertisement listener.
JVMRoute factory
| Tomcat attribute | AS7/WildFly attribute | Default | Location | Scope |
|---|---|---|---|---|
jvmRouteFactory |
None |
new SystemPropertyJvmRouteFactory(new UUIDJvmRouteFactory(), "jboss.mod_cluster.jvmRoute") |
Worker |
Worker |
Defines the strategy for determining the jvm route of a node, if none was specified in Tomcat’s server.xml.
The default factory first consults the jboss.mod_cluster.jvmRoute system property. If this system property is undefined, the jvm route is assigned a UUID.
WildFly with Undertow web subsystem uses Undertow’s instance-id or jboss.mod_cluster.jvmRoute system property or a UUID.
3.5.5. Proxy Configuration
The following configuration values are sent to proxies during server startup, when a proxy is detected via the advertise mechanism, or during the resetting of a proxy’s configuration during error recovery.
| Attribute | AS7 Attribute | Default | Scope | Description |
|---|---|---|---|---|
stickySession |
sticky-session |
true |
Balancer |
Indicates whether subsequent requests for a given session should be routed to the same node, if possible. |
stickySessionRemove |
sticky-session-remove |
false |
Balancer |
Indicates whether the httpd proxy should remove session stickiness in the event that the balancer is unable to route a request to the node to which it is stuck. This property is ignored if stickySession is false. |
stickySessionForce |
sticky-session-force |
false |
Balancer |
Indicates whether the httpd proxy should return an error in the event that the balancer is unable to route a request to the node to which it is stuck. This property is ignored if stickySession is false. |
workerTimeout |
worker-timeout |
-1 |
Balancer |
Number of seconds to wait for a worker to become available to handle a request. When no workers of a balancer are usable, mod_cluster will retry after a while (workerTimeout/100). That is timeout in the balancer mod_proxy documentation. A value of -1 indicates that the httpd will not wait for a worker to be available and will return an error if none is available. |
maxAttempts |
max-attempts |
1 |
Balancer |
Maximum number of failover attempts before giving up. The minimum value is 0, i.e. no failover. The default value is 1, i.e. do a one failover attempt. |
flushPackets |
flush-packets |
false |
Node |
Enables/disables packet flushing |
flushWait |
flush-wait |
-1 |
Node |
Time to wait before flushing packets in milliseconds. A value of -1 means wait forever. |
ping |
ping |
10 |
Node |
Time (in seconds) in which to wait for a pong answer to a ping |
smax |
smax |
Determined by httpd configuration |
Node |
Soft maximum idle connection count (that is the smax in worker mod_proxy documentation). The maximum value depends on the httpd thread configuration (ThreadsPerChild or 1). |
ttl |
ttl |
60 |
Node |
Time to live (in seconds) for idle connections above smax |
nodeTimeout |
node-timeout |
-1 |
Node |
Timeout (in seconds) for proxy connections to a node. That is the time mod_cluster will wait for the back-end response before returning error. That corresponds to timeout in the worker mod_proxy documentation. A value of -1 indicates no timeout. Note that mod_cluster always uses a cping/cpong before forwarding a request and the connectiontimeout value used by mod_cluster is the ping value. |
balancer |
balancer |
mycluster |
Node |
The balancer name |
loadBalancingGroup |
domain load-balancing-group |
None |
Node |
If specified, load will be balanced among jvmRoutes withing the same load balancing group. A loadBalancingGroup is conceptually equivalent to a mod_jk domain directive. This is primarily used in conjunction with partitioned session replication (e.g. buddy replication). |
| When nodeTimeout is not defined the ProxyTimeout directive Proxy is used. If ProxyTimeout is not defined the server timeout (Timeout) is used (default 300 seconds). nodeTimeout, ProxyTimeout or Timeout is set at the socket level. |
SSL Configuration
The communication channel between application servers and httpd proxies uses HTTP by default. This channel can be secured using HTTPS by setting the ssl property to true.
| This HTTP/HTTPS channel should not be confused with the processing of HTTP/HTTPS client requests. |
| Attribute | AS7 Attribute | Default | Description |
|---|---|---|---|
ssl |
None |
false |
Should connection to proxy use a secure socket layer |
sslCiphers |
cipher-suite |
The default JSSE cipher suites |
Overrides the cipher suites used to initialize an SSL socket ignoring any unsupported ciphers |
sslProtocol |
protocol |
TLS (ALL in AS7) |
Overrides the default SSL socket protocol. |
sslCertificateEncodingAlgorithm |
None |
The default JSSE key manager algorithm |
The algorithm of the key manager factory |
sslKeyStore |
certificate-key-file |
System.getProperty("user.home") + "/.keystore" |
The location of the key store containing client certificates |
sslKeyStorePassword |
password |
changeit |
The password granting access to the key store (and trust store in AS7) |
sslKeyStoreType |
None |
JKS |
The type of key store |
sslKeyStoreProvider |
None |
The default JSSE security provider |
The key store provider |
sslTrustAlgorithm |
None |
The default JSSE trust manager algorithm |
The algorithm of the trust manager factory |
sslKeyAlias |
key-alias |
The alias of the key holding the client certificates in the key store |
|
sslCrlFile |
ca-revocation-url |
Certificate revocation list |
|
sslTrustMaxCertLength |
None |
5 |
The maximum length of a certificate held in the trust store |
sslTrustStore |
None |
javax.net.ssl.trustStorePassword |
The location of the file containing the trust store |
sslTrustStorePassword |
None |
javax.net.ssl.trustStore |
The password granting access to the trust store. |
sslTrustStoreType |
None |
javax.net.ssl.trustStoreType |
The trust store type |
sslTrustStoreProvider |
None |
javax.net.ssl.trustStoreProvider |
The trust store provider |
Load Configuration for JBoss Web and Tomcat
Additional configuration properties used when mod_cluster is configured in JBoss Web standalone or Tomcat.
| Attribute | Default | Description |
|---|---|---|
loadMetricClass |
org.jboss.modcluster.load.metric.impl.BusyConnectorsLoadMetric |
Class name of an object implementing |
loadMetricCapacity |
1 |
The capacity of the load metric defined via the loadMetricClass property. |
loadHistory |
9 |
The number of historic load values to consider in the load balance factor computation. |
loadDecayFactor |
2 |
The factor by which a historic load values should degrade in significance. |
initialLoad |
0 |
Initial load within the range [0..100] with which to prepopulate historical values. Used to gradually drive load to the node. Value of 0 prepopulates with full load and value of -1 disables this behavior. |
3.6. Worker-side Load Metrics
A major feature of mod_cluster is the ability to use server-side load metrics to determine how best to balance requests.
The DynamicLoadBalanceFactorProvider bean computes the load
balance factor of a node from a defined set of load metrics.
<bean name="DynamicLoadBalanceFactorProvider" class="org.jboss.modcluster.load.impl.DynamicLoadBalanceFactorProvider" mode="On Demand">
  <annotation>@org.jboss.aop.microcontainer.aspects.jmx.JMX(name="jboss.web:service=LoadBalanceFactorProvider",exposedInterface=org.jboss.modcluster.load.impl.DynamicLoadBalanceFactorProviderMBean.class)</annotation>
  <constructor>
    <parameter>
      <set elementClass="org.jboss.modcluster.load.metric.LoadMetric">
        <inject bean="BusyConnectorsLoadMetric"/>
        <inject bean="HeapMemoryUsageLoadMetric"/>
      </set>
    </parameter>
  </constructor>
  <property name="history">9</property>
  <property name="decayFactor">2</property>
  <property name="initialLoad">0</property>
</bean>
Load metrics can be configured with an associated weight and capacity.
The weight (default is 1) indicates the significance of a metric with respect to the other metrics. For example, a metric of weight 2 will have twice the impact on the overall load factor than a metric of weight 1.
The capacity of a metric serves 2 functions:
-
To normalize the load values from each metric. In some load metrics, capacity is already reflected in the load values. The capacity of a metric should be configured such that
0 <= (load / capacity) <= 1. -
To favor some nodes over others. By setting the metric capacities to different values on each node, proxies will effectively favor nodes with higher capacities, since they will return smaller load values. This adds an interesting level of granularity to node weighting. Consider a cluster of two nodes, one with more memory, and a second with a faster CPU; and two metrics, one memory-based and the other CPU-based. In the memory-based metric, the first node would be given a higher load capacity than the second node. In a CPU-based metric, the second node would be given a higher load capacity than the first node.
Each load metric contributes a value to the overall load factor of a node. The load factors from each metric are aggregated according to their weights.
In general, the load factor contribution of a given metric is: (load /
capacity) * weight / total weight.
The DynamicLoadBalanceFactorProvider applies a time decay function to the loads returned by each metric. The aggregate load, with respect to previous load values, can be expressed by the following formula:
L = (L0/D0 + L 1/D1 + L2/D2 + L3/D3 + ... + LH/DH) / (1/D0 + 1/D1 + 1/D2 + 1/D3 + ... 1/DH)
-
or more concisely as:
L = (∑Hi=0 Li/Di) / (∑Hi=0 1/Di)
-
where D = decayFactor, and H = history.
Setting history = 0 effectively disables the time decay function and only the current load for each metric will be considered in the load balance factor computation.
The mod_cluster load balancer expects the load factor to be an integer between 0 and 100, where 0 indicates max load and 100 indicates zero load. Therefore, the final load factor sent to the load balancer
LFinal = 100 - (L * 100)
While you are free to write your own load metrics, the following LoadMetrics are available out of the box:
3.6.1. Web Container metrics
Active Sessions Load Metric
-
Requires an explicit capacity
-
Uses
SessionLoadMetricSourceto query session managers -
Analogous to method=S in mod_jk
e.g., with JBoss AS 5:
<bean name="ActiveSessionsLoadMetric" class="org.jboss.modcluster.load.metric.impl.ActiveSessionsLoadMetric" mode="On Demand">
  <annotation>@org.jboss.aop.microcontainer.aspects.jmx.JMX(name="jboss.web:service=ActiveSessionsLoadMetric",exposedInterface=org.jboss.modcluster.load.metric.LoadMetricMBean.class)</annotation>
  <constructor>
    <parameter><inject bean="SessionLoadMetricSource"/></parameter>
  </constructor>
  <property name="capacity">1000</property>
</bean>
<bean name="SessionLoadMetricSource" class="org.jboss.modcluster.load.metric.impl.SessionLoadMetricSource" mode="On Demand">
  <constructor>
    <parameter class="javax.management.MBeanServer">
      <inject bean="JMXKernel" property="mbeanServer"/>
    </parameter>
  </constructor>
</bean>
Busy Connectors Load Metric
-
Returns the percentage of connector threads from the thread pool that are busy servicing requests
-
Uses
ThreadPoolLoadMetricSourceto query connector thread -
Analogous to
method=Bin mod_jk
e.g., with JBoss AS 5:
<bean name="BusyConnectorsLoadMetric" class="org.jboss.modcluster.load.metric.impl.BusyConnectorsLoadMetric" mode="On Demand">
  <annotation>@org.jboss.aop.microcontainer.aspects.jmx.JMX(name="jboss.web:service=BusyConnectorsLoadMetric",exposedInterface=org.jboss.modcluster.load.metric.LoadMetricMBean.class)</annotation>
  <constructor>
    <parameter><inject bean="ThreadPoolLoadMetricSource"/></parameter>
  </constructor>
</bean>
<bean name="ThreadPoolLoadMetricSource" class="org.jboss.modcluster.load.metric.impl.ThreadPoolLoadMetricSource" mode="On Demand">
  <constructor>
    <parameter class="javax.management.MBeanServer">
      <inject bean="JMXKernel" property="mbeanServer"/>
    </parameter>
  </constructor>
</bean>
Receive Traffic Load Metric
-
Returns the incoming request POST traffic in KB/sec (the application needs to read POST data)
-
Requires an explicit capacity
-
Uses
RequestProcessorLoadMetricSourceto query request processors -
Analogous to
method=Tin mod_jk
e.g., with JBoss AS 5:
<bean name="ReceiveTrafficLoadMetric" class="org.jboss.modcluster.load.metric.impl.ReceiveTrafficLoadMetric" mode="On Demand">
  <annotation>@org.jboss.aop.microcontainer.aspects.jmx.JMX(name="jboss.web:service=ReceiveTrafficLoadMetric",exposedInterface=org.jboss.modcluster.load.metric.LoadMetricMBean.class)</annotation>
  <constructor>
    <parameter class="org.jboss.modcluster.load.metric.impl.RequestProcessorLoadMetricSource">
      <inject bean="RequestProcessorLoadMetricSource"/>
    </parameter>
  </constructor>
  <property name="capacity">1024</property>
</bean>
<bean name="RequestProcessorLoadMetricSource" class="org.jboss.modcluster.load.metric.impl.RequestProcessorLoadMetricSource" mode="On Demand">
  <constructor>
    <parameter class="javax.management.MBeanServer">
      <inject bean="JMXKernel" property="mbeanServer"/>
    </parameter>
  </constructor>
</bean>
Send Traffic Load Metric
-
Returns the outgoing request traffic in KB/sec
-
Requires an explicit capacity
-
Uses
RequestProcessorLoadMetricSourceto query request processors -
Analogous to method=T in mod_jk
e.g., with JBoss AS 5:
<bean name="SendTrafficLoadMetric" class="org.jboss.modcluster.load.metric.impl.SendTrafficLoadMetric" mode="On Demand">
  <annotation>@org.jboss.aop.microcontainer.aspects.jmx.JMX(name="jboss.web:service=SendTrafficLoadMetric",exposedInterface=org.jboss.modcluster.load.metric.LoadMetricMBean.class)</annotation>
  <constructor>
    <parameter class="org.jboss.modcluster.load.metric.impl.RequestProcessorLoadMetricSource">
      <inject bean="RequestProcessorLoadMetricSource"/>
    </parameter>
  </constructor>
  <property name="capacity">512</property>
</bean>
Request Count Load Metric
-
Returns the number of requests/sec
-
Requires an explicit capacity
-
Uses
RequestProcessorLoadMetricSourceto query request processors -
Analogous to
method=Rin mod_jk
e.g., with JBoss AS 5:
<bean name="RequestCountLoadMetric" class="org.jboss.modcluster.load.metric.impl.RequestCountLoadMetric" mode="On Demand">
  <annotation>@org.jboss.aop.microcontainer.aspects.jmx.JMX(name="jboss.web:service=RequestCountLoadMetric",exposedInterface=org.jboss.modcluster.load.metric.LoadMetricMBean.class)</annotation>
  <constructor>
    <parameter class="org.jboss.modcluster.load.metric.impl.RequestProcessorLoadMetricSource">
      <inject bean="RequestProcessorLoadMetricSource"/>
    </parameter>
  </constructor>
  <property name="capacity">1000</property>
</bean>
3.6.2. System/JVM metrics
Average System Load Metric
-
Returns CPU load
-
Requires Java 1.6+
-
Uses
OperatingSystemLoadMetricSourceto generically read attributes -
Is not available on Windows
e.g., with JBoss AS 5:
<bean name="AverageSystemLoadMetric" class="org.jboss.modcluster.load.metric.impl.AverageSystemLoadMetric" mode="On Demand">
  <annotation>@org.jboss.aop.microcontainer.aspects.jmx.JMX(name="jboss.web:service=AverageSystemLoadMetric",exposedInterface=org.jboss.modcluster.load.metric.LoadMetricMBean.class)</annotation>
  <constructor>
    <parameter><inject bean="OperatingSystemLoadMetricSource"/></parameter>
  </constructor>
</bean>
<bean name="OperatingSystemLoadMetricSource" class="org.jboss.modcluster.load.metric.impl.OperatingSystemLoadMetricSource" mode="On Demand">
</bean>
Heap Memory Usage Load Metric
-
Returns the heap memory usage as a percentage of max heap size
e.g., with JBoss AS 5:
<bean name="HeapMemoryUsageLoadMetric" class="org.jboss.modcluster.load.metric.impl.HeapMemoryUsageLoadMetric" mode="On Demand">
  <annotation>@org.jboss.aop.microcontainer.aspects.jmx.JMX(name="jboss.web:service=HeapMemoryUsageLoadMetric",exposedInterface=org.jboss.modcluster.load.metric.LoadMetricMBean.class)</annotation>
</bean>
3.6.3. Other metrics
ConnectionPoolUsageLoadMetric
-
Returns the percentage of connections from a connection pool that are in use
-
Uses ConnectionPoolLoadMetricSource to query JCA connection pools
e.g., with JBoss AS 5:
<bean name="ConnectionPoolUsageMetric" class="org.jboss.modcluster.load.metric.impl.ConnectionPoolUsageLoadMetric" mode="On Demand">
  <annotation>@org.jboss.aop.microcontainer.aspects.jmx.JMX(name="jboss.web:service=ConnectionPoolUsageLoadMetric",exposedInterface=org.jboss.modcluster.load.metric.LoadMetricMBean.class)</annotation>
  <constructor>
    <parameter><inject bean="ConnectionPoolLoadMetricSource"/></parameter>
  </constructor>
</bean>
<bean name="ConnectionPoolLoadMetricSource" class="org.jboss.modcluster.load.metric.impl.ConnectionPoolLoadMetricSource" mode="On Demand">
  <constructor>
    <parameter class="javax.management.MBeanServer">
      <inject bean="JMXKernel" property="mbeanServer"/>
    </parameter>
  </constructor>
</bean>
3.7. Installing Worker-side Components
First, extract the server-side binary to a temporary directory. The following assumes it was extracted to /tmp/mod_cluster
Your next step depends on whether your target server is JBoss AS or JBossWeb/Tomcat.
3.7.1. Installing in JBoss AS 6.0.0.M1 and up
You don’t need to do anything to install the java-side binaries in AS 6.x; it’s part of the AS distribution’s default, standard and all configurations.
3.7.2. Installing in JBoss AS 5.x
Assuming \$JBOSS_HOME indicates the root of your JBoss AS install and that you want to use mod_cluster in the AS’s all config:
cp -r /tmp/mod_cluster/mod_cluster.sar $JBOSS_HOME/server/all/deploy3.7.3. Installing in Tomcat
Assuming $CATALINA_HOME indicates the root of your Tomcat install:
cp /tmp/mod_cluster/JBossWeb-Tomcat/lib/jboss-logging.jar $CATALINA_HOME/lib/
cp /tmp/mod_cluster/JBossWeb-Tomcat/lib/mod_cluster-container-catalina* $CATALINA_HOME/lib/
cp /tmp/mod_cluster/JBossWeb-Tomcat/lib/mod_cluster-container-spi* $CATALINA_HOME/lib/
cp /tmp/mod_cluster/JBossWeb-Tomcat/lib/mod_cluster-core* $CATALINA_HOME/lib/
and additionally for Tomcat6:
cp /tmp/mod_cluster/JBossWeb-Tomcat/lib/mod_cluster-container-tomcat6* $CATALINA_HOME/liband additionally for Tomcat7:
cp /tmp/mod_cluster/JBossWeb-Tomcat/lib/mod_cluster-container-tomcat7* $CATALINA_HOME/lib4. httpd configuration
4.1. Apache httpd configuration
You need to load the modules that are needed for mod_proxy_cluster for example:
LoadModule proxy_module modules/mod_proxy.so
LoadModule proxy_http_module modules/mod_proxy_http.so
LoadModule proxy_ajp_module modules/mod_proxy_ajp.so
LoadModule slotmem_shm_module modules/mod_slotmem_shm.so
LoadModule manager_module modules/mod_manager.so
LoadModule proxy_cluster_module modules/mod_proxy_cluster.so
LoadModule advertise_module modules/mod_advertise.so
mod_cluster 1.3.x Note that mod_cluster 1.3.x has its own implementation of
a slotmem module. You have to change the appropriate line to
LoadModule cluster_slotmem_module modules/mod_cluster_slotmem.so to use it instead
of httpd’s implementation version 2.x uses.
|
mod_proxy and mod_proxy_ajp are standard httpd modules. mod_cluster_slotmem is a shared slotmem memory provider. mod_manager is the module that reads information from JBoss AS/JBossWeb/Tomcat and updates the shared memory information. mod_proxy_cluster is the module that contains the balancer for mod_proxy. mod_advertise is an additional module that allows httpd to advertise via multicast packets the IP and port where the mod_proxy_cluster is listening. This multi-module architecture allows the modules to easily be changed depending on what the customer wants to do.
For example when using http instead of AJP, only remove the following line:
LoadModule proxy_ajp_module modules/mod_proxy_ajp.soAlternatively, if you want to use AJP only, remove the corresponding http line:
LoadModule proxy_http_module modules/mod_proxy_http.so4.2. mod_proxy configuration
mod_proxy directives like ProxyIOBufferSize could be used to configure mod_proxy_cluster. There is no need to use ProxyPass directives because mod_proxy_cluster automatically configures which URLs have to be forwarded to JBossWEB.
4.3. mod_slotmem/mod_cluster_slotmem configuration
The current version does not require any configuration directives. Make sure you are using the correct module according to your mod_proxy_cluster’s version.
4.4. mod_proxy_cluster
4.4.1. CreateBalancers
CreateBalancers define how balancers are created in the httpd VirtualHosts. This is to allow directives like:
ProxyPass / balancer://mycluster1/-
0 – Create in all VirtualHosts defined in httpd.
-
1 – Don’t create balancers (requires at least one ProxyPass/ProxyPassMatch to define the balancer names).
-
2 – Create only the main server.
Default: 2
CreateBalancers 1: When using 1 don’t forget to configure the balancer in the ProxyPass directive, because the default is
empty stickysession and nofailover=Off and the values received via the MCMP CONFIG message are ignored.
|
Default: 2 If you have no ProxyPass directive in the VirtualHost, the VirtualHost is ignored
by mod_proxy_cluster. So, even if CreateBalancers is set to 2 (default), the main server is used instead
in such configuration.
See also MODCLUSTER-430 – CreateBalancers behave the same with option 0 or 2
|
4.4.2. UseAlias
Check that the Alias corresponds to the ServerName (See Host Name Aliases).
-
Off – Don’t check (ignore Aliases)
-
On – Check aliases
Default: Off Ignore the Alias information from the nodes.
| Older mod_cluster versions: Versions older than 1.3.1.Final only accept values 0 and 1 respectively. |
UseAlias should be used with ProxyPreserveHost On to work properly.
|
4.4.3. LBstatusRecalTime
Time interval in seconds for load balancing logic to recalculate the status of a node.
Default: 5 seconds
The actual formula to recalculate the status of a node is:
status = lbstatus + (elected - oldelected) * 1000) / lbfactor;lbfactor is received for the node via STATUS messages.lbstatus is recalculated every LBstatusRecalTime seconds using the formula:
lbstatus = (elected - oldelected) * 1000) / lbfactor
where elected is the amount of time the worker has been elected. oldelected is elected from the last time the lbstatus
was recalculated. The node with the lowest status is selected. Nodes with lbfactor ≤ 0 are skipped by the both calculation logics.
4.4.4. WaitBeforeRemove
Time in seconds before a removed node is forgotten by httpd.
Default: 10 seconds
4.4.5. ProxyPassMatch/ProxyPass
ProxyPassMatch and ProxyPass are mod_proxy directives that when using ! (instead the back-end url) prevent to
reverse-proxy in the path. This could be used allow httpd to serve static information like images.
ProxyPassMatch ^(/.*\.gif)$ !The above for example will allow httpd to serve the .gif files directly.
4.4.6. EnableOptions
Use OPTIONS method to periodically check the active connection. Fulfils the same role as the CPING/CPONG used by AJP
but for HTTP/HTTPS connections. The endpoint needs to implement HTTP/1.0.
-
On (or no value) – Use OPTIONS
-
Off – Don’t use OPTIONS
Default: On
4.4.7. AJPSecret
Use AJPSecret your_secret to provide the secret for the AJP back-end. See mod_proxy_ajp and mod_proxy docs for more
information. If your_secret doesn’t correspond to the value configured in the back-end the back-end will return 503
to any request coming through the proxy.
4.4.8. EnableWsTunnel
Use ws or wss instead of http or https when creating nodes (allows WebSocket proxying).
4.4.9. WSUpgradeHeader
Use WSUpgradeHeader value to define the value of the upgrade header that is accepted (corresponds to
ProxyPass upgrade=value). Accepted values are following:
| 2.0 (in development) | 1.3 | mod_proxy_wstunnel (used in the past) | Description |
|---|---|---|---|
|
|
value |
protocol name to check before using the WS tunnel |
|
|
ANY |
read the header value from request |
NONE |
bypass the header check |
See mod_proxy_http documentation for more information.
4.4.10. ResponseFieldSize
Size in bytes of the HTTP/1.1 buffers of the workers, that limits the header size a webapp can use (Note: In Tomcat there is maxHttpHeaderSize that also limits it in the Connector).
Default: 8192
4.4.11. CacheShareFor
Time to cache the shared memory information in seconds.
Default: 0 (no-caching)
4.4.12. ModProxyClusterHCTemplate
Set of health check parameters to use with mod_proxy_cluster workers.
4.4.13. UseNocanon
When no ProxyPass or ProxyMatch match the URL, pass the raw URL path to the backend.
Default: Off
4.4.14. ResponseStatusCodeOnNoContext
Response code returned when ProxyPass or ProxyMatch doesn’t have any matching context.
If the configured value is not a standard HTTP response status code, the server will return 500 instead
(see MODCLUSTER-801). (Since 1.3.20.Final)
Default: 404
4.4.15. ModProxyClusterThreadCount
Number of threads that should be created for watchdog logic. Must be positive. (Since 2.0)
Default: 16
4.4.16. DeterministicFailover
Controls whether a node upon failover is chosen deterministically.
Default: Off
4.5. mod_manager
The Context of a mod_manger directive is VirtualHost except mentioned otherwise. server config means that it must be outside a VirtualHost configuration. If not an error message will be displayed and httpd will not start.
4.5.1. EnableMCMPReceive
EnableMCMPReceive – allow the VirtualHost to receive Mod-Cluster Management Protocol (MCMP) messages. You need one EnableMCMPReceive in your httpd configuration to allow mod_proxy_cluster to work, put it in the VirtualHost where you configure advertise.
This directive was added to address the issue of receiving MCMP on arbitrary VirtualHosts which was problematic due to accepting messages on insecure, unintended VirtualHosts.
Default: disabled (presence of the directive enables this functionality)
This directive deprecates the original EnableMCPMReceive option as it contains a typo.
The directive with the correct spelling is available in version 1.3.21.Final and newer.
|
4.5.2. MemManagerFile
That is the base name for the names mod_manager will use to store configuration, generate keys for shared memory or lock files. The value may be an absolute path name or a relative one (then it will be relative to the server root); the directories will be created if needed. It is highly recommended that those files are placed on a local drive and not an NFS share. (Context: server config)
Default: $server_root/logs/
4.5.3. Maxcontext
The maximum number of application contexts supported by mod_proxy_cluster. (Context: server config)
Default: 100 (If Maxhost is bigger than Maxcontext, then Maxcontext is increased to Maxhost.)
4.5.4. Maxnode
That is the maximum number of nodes supported by mod_proxy_cluster. (Context: server config)
Default: 20
4.5.5. Maxhost
That is the maximum number of hosts (Aliases) supported by mod_proxy_cluster. That is also the max number of balancers. (Context: server config)
Default: 20 (If Maxnode is bigger than Maxhost, then Maxhost is increased to Maxnode.)
4.5.6. Maxsessionid
Maxsessionid: That is the number of active sessionid we store to give number of active sessions in the mod_cluster-manager handler. A session is inactive when mod_cluster doesn’t receive any information from the session in 5 minutes. (Context: server config)
Default: 0 (the logic is not activated).
4.5.7. MaxMCMPMaxMessSize
MaxMCMPMaxMessSize: Maximum size of MCMP messages. from other Max directives.
Default: calculated from other Max directives. Min: 1024
4.5.8. ManagerBalancerName
ManagerBalancerName: That is the name of balancer to use when the JBoss AS/JBossWeb/Tomcat doesn’t provide a balancer name.
Default: mycluster
4.5.9. PersistSlots
PersistSlots: Tell mod_cluster_slotmem to persist the nodes, Alias and Context in files. (Context: server config)
Default: Off
4.5.10. CheckNonce
CheckNonce: Switch check of nonce when using mod_cluster-manager handler on | off
Default: on (Nonce checked)
4.5.11. AllowDisplay
AllowDisplay: Switch additional display on mod_cluster-manager main page on | off
Default: off (Only version displayed)
4.5.12. AllowCmd
AllowCmd: Allow commands using mod_cluster-manager URL on | off
Default: on (Commands allowed)
4.5.13. ReduceDisplay
ReduceDisplay - Reduce the information the main mod_cluster-manager page to allow more nodes in the page. on | off
Default: off (Full information displayed)
4.5.14. SetHandler mod_cluster-manager
SetHandler mod_cluster-manager: That is the handler to display the node mod_proxy_cluster sees from the cluster. It displays the information about the nodes like INFO and additionally counts the number of active sessions.
<Location /mod_cluster-manager>
   SetHandler mod_cluster-manager
   Require ip 127.0.0
</Location>
When accessing the location you define in httpd.conf you get something like:
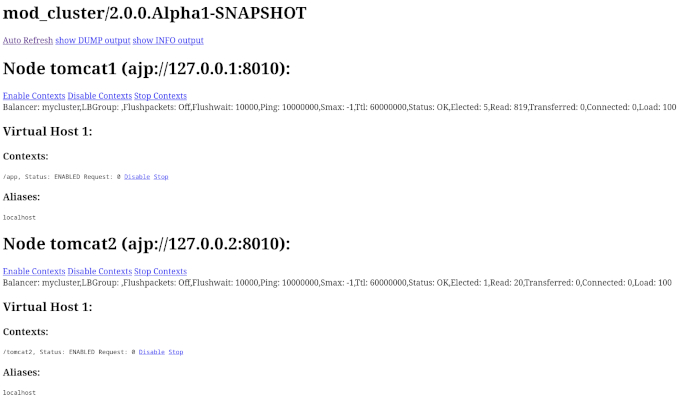
Note that:
-
Transferred: Corresponds to the POST data send to the back-end server.
-
Connected: Corresponds to the number of requests been processed when the mod_proxy_cluster status page was requested.
-
sessions: Corresponds to the number of sessions mod_proxy_cluster report as active (on which there was a request during the past 5 minutes). That field is not present when Maxsessionid is zero.
4.5.15. mod_advertise
mod_advertise uses multicast packets to advertise the VirtualHost where it is configured that must be the same VirtualHost where mod_manager is defined. Of course at least one mod_advertise must be in the VirtualHost to allow mod_proxy_cluster to find the right IP and port to give to the ClusterListener.
4.5.16. ServerAdvertise
-
ServerAdvertise On – Use the advertise mechanism to tell the JBoss AS/JBossWeb/Tomcat to whom it should send the cluster information.
-
ServerAdvertise On http://hostname:port – Tell the hostname and port to use. Only needed if the VirtualHost is not defined correctly, if the VirtualHost is a Name-based Virtual Host or when VirtualHost is not used.
-
ServerAdvertise Off – Don’t use the advertise mechanism.
Default: Off. (Any Advertise directive in a VirtualHost sets it to On in the VirtualHost)
4.5.17. AdvertiseGroup
AdvertiseGroup IP:port: That is the multicast address to use (something like 232.0.0.2:8090 for example). IP should correspond to AdvertiseGroupAddress and port to AdvertisePort in the JBoss AS/JBossWeb/Tomcat configuration. Note that if JBoss AS is used and the -u startup switch is included in the AS startup command, the default AdvertiseGroupAddress is the value passed via the -u. If port is missing the default port will be used: 23364.
Default: 224.0.1.105:23364.
4.5.18. AdvertiseFrequency
AdvertiseFrequency seconds[.milliseconds]: Time between the multicast messages advertising the IP and port.
Default: 10
4.5.19. AdvertiseSecurityKey
AdvertiseSecurityKey value: key string used to verify advertisements checksums. If configured on either side the verification is required. Both sides must use the same security key.
Default: No default value.
4.5.20. AdvertiseManagerUrl
AdvertiseManagerUrl value: Not used in this version (It is sent in the X-Manager-Url: value header). That is the URL that JBoss AS/JBossWeb/Tomcat should use to send information to mod_cluster
Default: No default value. Information not sent.
4.5.21. AdvertiseBindAddress
AdvertiseBindAddress IP:port: That is the address and port httpd is bind to send the multicast messages. This allow to specify an address on multi IP address boxes.
Default: 0.0.0.0:23364
4.6. Minimal Example
Beware of the different names of mod_cluster_slotmem.so and mod_slotmem.so between mod_cluster 1.3.x and older versions.
The 2.x version uses Apache HTTP Server’s mod_slotmem_shm.so.
4.6.1. mod_proxy_cluster 2.x with Apache HTTP Server 2.4.x
LoadModule proxy_module       modules/mod_proxy.so
LoadModule proxy_http_module  modules/mod_proxy_http.so
LoadModule proxy_ajp_module   modules/mod_proxy_ajp.so
LoadModule slotmem_shm_module modules/mod_slotmem_shm.so

LoadModule manager_module       modules/mod_manager.so
LoadModule proxy_cluster_module modules/mod_proxy_cluster.so
LoadModule advertise_module     modules/mod_advertise.so
LoadModule watchdog_module      modules/mod_watchdog.so

<IfModule manager_module>
  Listen 8090
  ServerName localhost
  <VirtualHost *:8090>

  # Where your worker nodes connect from
  <Location />
     Require ip 127.0.0
  </Location>

  ServerAdvertise On
  EnableMCMPReceive

  # Where administrator reads the console from
  <Location /mod_cluster-manager>
     SetHandler mod_cluster-manager
     Require ip 127.0.0
  </Location>

  </VirtualHost>
</IfModule>
For mod_proxy_cluster 1.3.x you have to change the slotmem module to:
LoadModule cluster_slotmem_module modules/mod_cluster_slotmem.so4.7. Building httpd modules
mod_cluster 1.3.x and older, both httpd modules and Tomcat/WildFly java libraries reside in the mod_cluster repository, see appropriate branches. New development of mod_cluster httpd modules takes place under a new name mod_proxy_cluster in the new repository mod_proxy_cluster.
See ASCII recorded tutorial on httpd modules compilation with your own system’s httpd.
4.7.1. Build from sources on Windows
We assume you already have a functional Apache HTTP Server on Windows. This example works with Apache Lounge HTTP Server. We also assume the system has MS Visual Studio (Community Edition is ample) and CMake installed. The example operates in cmder shell, but it is not mandatory. A simple Windows cmd prompt would work too.
-
Download the Apache Lounge distribution. Our example uses httpd-2.4.58-win64-VS17.zip.
-
unzipped:
C:\Users\%username%
ls
httpd-2.4.58-win64-VS17/ httpd-2.4.58-win64-VS17.zip-
Clone mod_proxy_cluster sources git:
git clone https://github.com/modcluster/mod_proxy_cluster.gitor download zipped main branch directly.
-
Proceed with env vars set and CMake build directory preparation:
C:\Users\%username%\mod_proxy_cluster\native (main)
mkdir build

C:\Users\%username%\mod_proxy_cluster\native (main)
cd build\

C:\Users\%username%\mod_proxy_cluster\native\build (main)
vcvars64.bat
Here comes the only slightly tricky part: Apache Lounge httpd ships all necessary *.lib files with exported symbols but for mod_proxy. Since mod_proxy is our dependency, we have to generate these exported symbols from mod_proxy dll.
dumpbin /exports C:\Users\%username%\Apache24\modules\mod_proxy.so> C:\Users\%username%\Apache24\modules\mod_proxy.exports

echo LIBRARY mod_proxy.so> C:\Users\%username%\Apache24\modules\mod_proxy.def

echo EXPORTS>> C:\Users\%username%\Apache24\modules\mod_proxy.def

for /f "skip=19 tokens=4" %A in (C:\Users\%username%\Apache24\modules\mod_proxy.exports) do echo %A >> C:\Users\%username%\Apache24\modules\mod_proxy.def

lib /def:C:\Users\%username%\Apache24\modules\mod_proxy.def /OUT:C:\Users\%username%\Apache24\modules\mod_proxy.lib /MACHINE:X64 /NAME:mod_proxy.so
Let’s run CMake:
C:\Users\%username%\mod_proxy_cluster\native\build (main)
cmake ../ -G "NMake Makefiles" -DCMAKE_BUILD_TYPE=Release -DAPR_LIBRARY=C:\Users\%username%\Apache24\lib\libapr-1.lib -DAPR_INCLUDE_DIR=C:\Users\%username%\Apache24\include\ -DAPACHE_INCLUDE_DIR=C:\Users\%username%\Apache24\include\ -DAPRUTIL_LIBRARY=C:\Users\%username%\Apache24\lib\libaprutil-1.lib -DAPRUTIL_INCLUDE_DIR=C:\Users\%username%\Apache24\include\ -DAPACHE_LIBRARY=C:\Users\%username%\Apache24\lib\libhttpd.lib -DPROXY_LIBRARY=C:\Users\%username%\Apache24\modules\mod_proxy.lib
-- Found APR: C:/Users/karm/Apache24/lib/libapr-1.lib
-- Found APRUTIL: C:/Users/karm/Apache24/lib/libaprutil-1.lib
-- Found APACHE: C:/Users/karm/Apache24/include
-- Build files have been written to: C:/Users/karm/mod_proxy_cluster/native/build
Compile
C:\Users\%username%\mod_proxy_cluster\native\build (main)
nmake
Directory modules now contains all necessary modules:
C:\Users\%username%\mod_proxy_cluster\native\build (main)
copy modules\*.so C:\Users\%username%\Apache24\modules\
'modules/mod_advertise.so' -> 'C:/Users/karm/Apache24/modules/mod_advertise.so'
'modules/mod_manager.so' -> 'C:/Users/karm/Apache24/modules/mod_manager.so'
'modules/mod_proxy_cluster.so' -> 'C:/Users/karm/Apache24/modules/mod_proxy_cluster.so'
Done.
4.7.2. Build from sources on Linux/Unix
As for Windows, you can download the httpd bundle as well from here.
Alternatively, you can use your distribution’s repositories (on Fedora, you can install httpd simply
by executing dnf install httpd), or you can build httpd from sources.
To build httpd-2.4.x from its sources see ASF httpd 2.4 doc.
Download the sources and configure httpd with following:
./configure --prefix=apache_installation_directory \
            --with-included-apr \
            --enable-proxy-ajp \
            --enable-so \
            --enable-proxy \
            --enable-proxy-http \
            --enable-proxy-hcheck \
            --with-port=8000 \
--with-libxml2| Please bear in mind that the exact arguments/flags might differ based on your library choosing. Always consult the documentation. |
In case you want to use httpd for development purposes, you might find useful adding
--enable-maintainer-mode flag.
|
Build (make) and install (make install) httpd as configured.
4.7.3. Build the modules of mod_proxy_cluster
You need an httpd installation with mod_proxy (--enable-proxy) and ajp
protocol (--enable-proxy-ajp) enabled and with dso enabled (--enable-so).
Download the mod_proxy_cluster sources:
git clone git://github.com/modcluster/mod_proxy_cluster.gitor download zipped main branch directly.
Build the mod_proxy_cluster’s modules components, for each subdirectory advertise, mod_manager and mod_proxy_cluster do following:
sh buildconf
./configure --with-apxs=apxs_file_location
make clean
make
cp *.so $APACHE_DIR/modules
or alternatively using CMake:
# create a new subdirectory within native/ directory
mkdir build
cd build
cmake ..
make
cp modules/*so $APACHE_DIR/modules
Where $APACHE_DIR is the location of the installed httpd.
The apxs file can be found in your $APACHE_DIR/bin directory.
You can ignore the libtool message on most platforms
(libtool: install: warning: remember to run `libtool --finish $APACHE_DIR/modules').
|
| For mod_proxy_cluster 1.3.x you have to build mod_cluster_slotmem with the rest of modules. |
Once that is done use Apache httpd configuration to configure mod_proxy_cluster.
4.7.4. Configuration
A minimal configuration for mod_proxy_cluster to work is needed in httpd. A listener must be added in JWS/Tomcat’s conf/server.xml.
The httpd.conf is located in httpd/conf/ directory. To quickly test that everything is in place, add the configuration from the minimal example.
To start httpd do the following:
httpd/sbin/apachectl start| Make sure to use SSL before going in production. |
5. Security configuration
5.1. Using SSL in mod_cluster
Forwarding SSL browser information when using http/https between httpd and JBossWEB:
There are 2 connections between the cluster and the front-end. Both could be encrypted. That chapter describes how to encrypt both connections.
5.1.1. Using SSL between JBossWEB and httpd
As the ClusterListener allows to configure httpd it is advised to use SSL for that connection. The most easy is to use a virtual host that will only be used to receive information from JBossWEB. Both side need configuration.
Apache httpd configuration part
mod_ssl of httpd is using to do that. See in one example how easy the configuration is:
Listen 8090

<VirtualHost 10.33.144.3:8090>
    SSLEngine on
    SSLCipherSuite AES128-SHA:ALL:!ADH:!LOW:!MD5:!SSLV2:!NULL
    SSLCertificateFile conf/server.crt
    SSLCertificateKeyFile conf/server.key
    SSLCACertificateFile conf/server-ca.crt
    SSLVerifyClient require
    SSLVerifyDepth 10
</VirtualHost>
The conf/server.crt file is the PEM-encoded Certificate file for the VirtualHost it must be signed by a Certificate Authority (CA) whose certificate is stored in the sslTrustStore of the ClusterListener parameter.
The conf/server.key file is the file containing the private key.
The conf/server-ca.crt file is the file containing the certificate of the CA that have signed the client certificate JBossWEB is using. That is the CA that have signed the certificate corresponding to the sslKeyAlias stored in the sslKeyStore of the ClusterListener parameters.
ClusterListener configuration part
There is a ModCluster Listener article describing the SSL parameters of the ClusterListener. See in one example how easy the configuration is:
<Listener className="org.jboss.web.cluster.ClusterListener"
          ssl="true"
          sslKeyStorePass="changeit"
          sslKeyStore="/home/jfclere/CERTS/CA/test.p12"
          sslKeyStoreType="PKCS12"
          sslTrustStore="/home/jfclere/CERTS/CA/ca.p12"
          sslTrustStoreType="PKCS12"
          sslTrustStorePassword="changeit"
          />
The sslKeyStore file contains the private key and the signed certificate of the client certificate JBossWEB uses to connect to httpd. The certificate must be signed by a Certificate Authority (CA) who certificate is in the conf/server-ca.crt file of the httpd
The sslTrustStore file contains the CA certificate of the CA that signed the certificate contained in conf/server.crt file.
mod-cluster-jboss-beans configuration part
The mod-cluster-jboss-beans.xml in
$JBOSS_HOME/server/profile/deploy/mod-cluster.sar/META-INF in the
ClusterConfig you are using you should have something like:
<property name="ssl">true</property>
<property name="sslKeyStorePass">changeit</property>
<property name="sslKeyStore">/home/jfclere/CERTS/test.p12</property>
<property name="sslKeyStoreType">pkcs12</property>
<property name="sslTrustStore">/home/jfclere/CERTS/ca.p12</property>
<property name="sslTrustStoreType">pkcs12</property>
<property name="sslTrustStorePassword">changeit</property>
How the different files were created
The files were created using OpenSSL utilities see OpenSSL CA.pl (/etc/pki/tls/misc/CA for example) has been used to create the test Certificate authority, the certificate requests and private keys as well as signing the certificate requests.
Create the CA
Create a work directory and work for there:
mkdir -p CERTS/Server
cd CERTS/Server
Create a new CA:
/etc/pki/tls/misc/CA -newcaThat creates a directory for example ../../CA that contains a cacert.pem file which content have to be added to the conf/server-ca.crt described above.
Export the CA certificate to a .p12 file:
openssl pkcs12 -export -nokeys -in ../../CA/cacert.pem -out ca.p12That reads the file cacert.pem that was created in the previous step and convert it into a pkcs12 file the JVM is able to read.
That is the ca.p12 file used in the sslTrustStore parameter above.
Create the server certificate
Create a new request:
/etc/pki/tls/misc/CA -newreqThat creates 2 files named newreq.pem and newkey.pem. newkey.pem is the file conf/server.key described above.
Sign the request:
/etc/pki/tls/misc/CA -signreqThat creates a file named newcert.pem. newcert.pem is the file conf/server.crt described above. At that point you have created the SSL stuff needed for the VirtualHost in httpd. You should use a browser to test it after importing in the browser the content of the cacert.pem file.
Create the client certificate
Create a work directory and work for there:
mkdir -p CERTS/Client
cd CERTS/Client
Create request and key for the JBossWEB part.
/etc/pki/tls/misc/CA -newreqThat creates 2 files: Request is in newreq.pem, private key is in newkey.pem
Sign the request.
/etc/pki/tls/misc/CA -signreqThat creates a file: newcert.pem
Don’t use a passphrase when creating the client certificate or remove it before exporting:
openssl rsa -in newkey.pem -out key.txt.pem
mv key.txt.pem newkey.pem
Export the client certificate and key into a p12 file.
openssl pkcs12 -export -inkey newkey.pem -in newcert.pem -out test.p12That is the sslKeyStore file described above (/home/jfclere/CERTS/CA/test.p12)
Using SSL between httpd and JBossWEB
Using https allows to encrypt communications between httpd and JBossWEB. But due to the resources it needs that no advised to use it in high load configuration.
See Encrypting connection between httpd and TC for detailed instructions.
httpd is configured to be a client for AS/TC, so it should provide a certificate AS/TC will accept and have a private key to encrypt the data, it also needs a CA certificate to valid the certificate AS/TC will use for the connection.
SSLProxyEngine On
SSLProxyVerify require
SSLProxyCACertificateFile conf/cacert.pem
SSLProxyMachineCertificateFile conf/proxy.pem
conf/proxy.pem should contain both key and certificate. The certificate must be trusted by Tomcat via the CA in truststoreFile of <connector/>.
conf/cacert.pem must contain the certificate of the CA that signed the AS/TC certificate. The correspond key and certificate are the pair specified by keyAlias and truststoreFile of the <connector/>. Of course the <connector/> must be the https one (normally on port 8443).
How the different files were created
The files were created using OpenSSL utilities see OpenSSL CA.pl (/etc/pki/tls/misc/CA for example) has been used to create the test Certificate authority, the certificate requests and private keys as well as signing the certificate requests.
Create the CA
(See above)
Create the server certificate
(See above)
The certificate and key need to be imported into the java keystore using keytool
make sure you don’t use a passphrase for the key (don’t forget to clean the file when done)
Convert the key and certificate to p12 file:
openssl pkcs12 -export -inkey key.pem -in newcert.pem -out test.p12make sure you use the keystore password as Export passphrase.
Import the contents of the p12 file in the keystore:
keytool -importkeystore -srckeystore test.p12 -srcstoretype PKCS12Import the CA certificate in the java trust store: (Fedora 13 example).
keytool -import -trustcacerts -alias "caname" -file ../../CA/cacert.pem -keystore /etc/pki/java/cacertsEdit server.xml to have a <connector/> similar to:
<Connector port="8443" protocol="HTTP/1.1" SSLEnabled="true"
           keyAlias="1"
           truststoreFile="/etc/pki/java/cacerts"
           maxThreads="150" scheme="https" secure="true"
           clientAuth="true" sslProtocol="TLS" />
Start TC/AS and use openssl s_client to test the connection:
openssl s_client -CAfile /home/jfclere/CA/cacert.pem -cert newcert.pem -key newkey.pem -host localhost -port 8443There shouldn’t be any error, and you should be able to see your CA in the "Acceptable client certificate CA names".
Forwarding SSL browser information when using http/https between httpd and JBossWEB
When using http or https between httpd and JBossWEB you need to use the SSLValve and export the SSL variable as header in the request in httpd. If you are using AJP, mod_proxy_ajp will read the SSL variables and forward them to JBossWEB automatically.
See Forwarding SSL environment when using http/https proxy for detailed instructions.
The SSL variable used by mod_proxy_ajp are the following:
-
"HTTPS" SSL indicator.
-
"SSL_CLIENT_CERT" Chain of client certificates.
-
"SSL_CIPHER" The cipher used.
-
"SSL_SESSION_ID" The ID of the session.
-
"SSL_CIPHER_USEKEYSIZE" Size of the key used.
6. Load Balancing Demo Application
| The demo application has not been recently updated and might not work with newer software versions as described below! |
6.1. Overview
The mod_cluster distribution includes a demo application that helps demonstrate how different server-side scenarios affect the routing of client requests by the load balancer. The demo application is located in the mod_cluster distribution’s demo directory.
The demo application consists of two components:
-
The first component is a war file that needs to be deployed in JBossWeb/Tomcat/JBoss AS. The war includes a number of servlets.
-
The second component is a GUI application that allows a user to launch a pool of threads that repeatedly make requests to the load balancer. The requests are ultimately routed to the demo war’s primary servlet. The application tracks which servers are handling the requests and displays this information in a chart.
The application can also send separate requests to the demo war’s load generation servlets, allowing the user to see how different load conditions affect the balancing of requests.
Note that the demo application does not actually depend on mod_cluster in any way. Its only dependency is on JBossWeb/Tomcat. [1]Consequently, the demo can be used to demonstrate the effect of different server-side scenarios on the routing decisions made by any load balancer, including mod_jk, mod_proxy or the various hardware load balancers.
Note also that this demo application is not intended to be used as a load testing tool; i.e. something that can demonstrate the maximum load a cluster configuration can handle. Using it as such has a good chance of showing you the maximum load the client can generate rather than the maximum load your cluster can handle.
6.2. Basic Usage
To run the demo application:
-
Unpack the mod_cluster distribution on your filesystem. Here we assume it has been unzipped to ~/mod_cluster or C:\mod_cluster.
-
Install mod_cluster into your httpd server as described at Installation of the httpd part
-
Install mod_cluster into your JBossAS/JBossWeb/Tomcat servers as described at Installation on the Java side
-
In AS7 you have to set org.apache.tomcat.util.ENABLE_MODELER to true, Something like:
<system-properties>
    <property name="org.apache.tomcat.util.ENABLE_MODELER" value="true"/>
</system-properties>-
Start httpd and your JBossAS/JBossWeb/Tomcat servers
-
Deploy the application war file that you can find in demo/server/target/ and the name will be mod_cluster-demo-server-<mod_cluster-version>-SNAPSHOT.war where you substitute the mod_cluster’s version according to your distribution.
-
Start the demo application:
-
On *nix:
-
cd ~/mod_cluster/demo/client/target/classes
./run-demo.sh-
On Windows
C:\> cd mod_cluster\demo\client\target\classes
C:\mod_cluster\demo\client> run-demo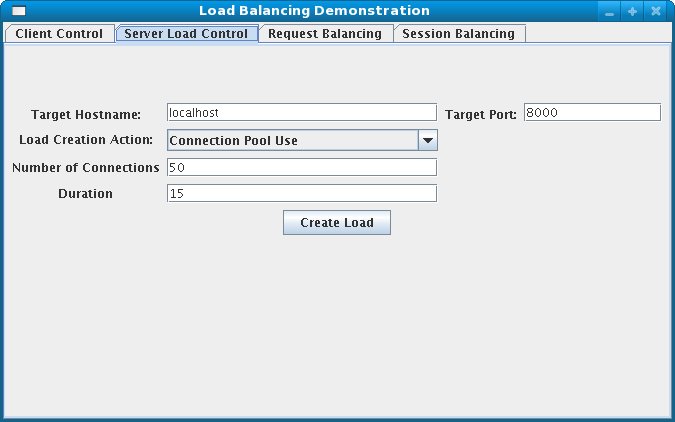
-
Configure the hostname and address of the httpd server, the number of client threads, etc and click the "Start" button. See Client Driver Configuration Options for details on the configuration options.
-
Switch to the "Request Balancing" tab to see how many requests are going to each of your JBossAS/JBossWeb/Tomcat servers.
-
Switch to the "Session Balancing" tab to see how many active sessions[2] are being hosted by each of your JBossAS/JBossWeb/Tomcat servers.
-
Stop some of your JBossAS/JBossWeb/Tomcat servers and/or undeploy the load-demo.war from some of the servers and see the effect this has on load balancing.
-
Restart some of your JBossAS/JBossWeb/Tomcat servers and/or re-deploy the demo application to some of the servers and see the effect this has on load balancing.
-
Experiment with adding artificial load to one or more servers to see what effect that has on load balancing. See Load Generation Scenarios for details.
Most of the various panels in application interface also present information on the current status on any client threads. "Total Clients" is the number of client threads created since the last time the "Start" button was pushed. "Live Clients" is the number of threads currently running. "Failed Clients" is the number of clients that terminated abnormally; i.e. made a request that resulted in something other than an HTTP 200 response.
6.3. Client Driver Configuration Options
The configuration of the client is driver is done via the application’s "Clent Control" tab.
The panel includes the following options:
-
Proxy Hostname: Hostname of the load balancer or the IP address on which it is listening for requests[3]
-
Proxy Port: Port on which the load balancer is listening for requests[4]
-
Context Path: Portion of the request URL that specifies the request is for the load-demo.war
-
Session Life: Number of seconds a client thread should use a session before invalidating or abandoning it. Generally it is good to keep this to a small value; otherwise the use of session stickiness will prevent changes in server load from affecting the load balancer’s routing decisions. With sticky sessions enabled (strongly recommended), it is the creation of a new session that allows the load balancer to try to balance load.
-
Invalidate: Controls what the client thread should do when it stops using a session because Session Life has passed. If checked, the driver will send a request that results in the session being invalidated. If unchecked, the session will just be abandoned, and will continue to exist on the server until Session Timeout seconds have passed. In the future this will likely be changed to a percentage input, so X% can be invalidated, the rest abandoned.
-
Session Timeout: Number of seconds a session can remain unused before the server is free to expire it. Unchecking Invalidate and setting a high value relative to Session Life allows a significant number of unused sessions to accumulate on the server.
-
Num Threads: Number of client threads to launch. Each thread repeatedly makes requests until the "Stop" button is pushed or a request receives a response other than HTTP 200.
-
Sleep Time: Number of ms the client threads should sleep between requests.
-
Startup Time: Number of seconds over which the application should stagger the start of the client threads. Staggering the start advised as it avoids the unnatural situation where for the life of the demonstation all sessions start at about the same time and then are invalidated or abandoned at the same time. Staggering the start allows the load balancer to continually see new sessions and decide how to route them.
6.4. Load Generation Scenarios
You can use the application’s GUI to instruct individual servers to artificially generate various types of load, and then track how that load affects request and session balancing. Load generation is controlled via the application’s "Server Load Control" tab.
The panel includes the following options:
-
Target Hostname and Target Port: The hostname or IP address of the server on which you want load generated. There are two strategies for setting these:
-
You can use the hostname and port of the load balancer, in which case the load balancer will pick a backend server and route the request to it. Note the client application does not maintain a session cookie for these requests, so if you invoke another server load generation request, you shouldn’t expect the same server to handle it.
-
If the JBoss AS/JBossWeb/Tomcat servers are running the HttpConnector as well as the AJP connector, you can specify the address and port on which a particular server’s HttpConnector is listening. The standard port is 8080.
-
Load Creation Action: Specifies the type of load the target server should generate. See below for details on the available load types.
-
Params: Zero or more parameters to pass to the specified load creation servlet. For example, in the screenshot above, Number of Connections and Duration. How many parameters are displayed, their name and their meaning depend on the selected Load Creation Action. The label for each parameter includes a tooltip that explains its use.
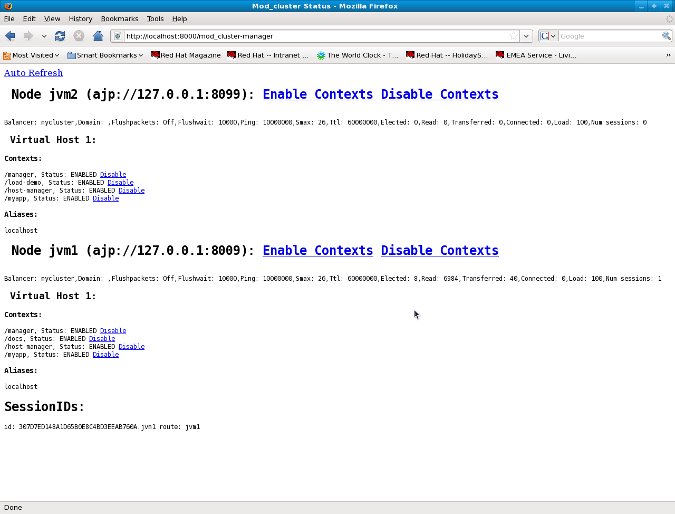
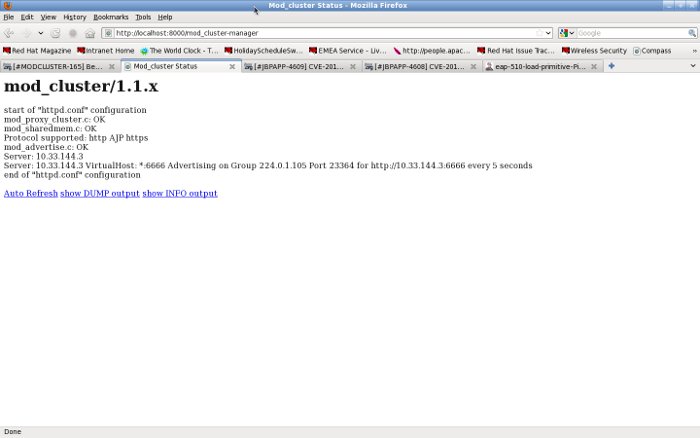
The available Load Creation Actions are as follows:
- Active Sessions
-
Generates server load by causing session creation on the target server.
- Datasource Use
-
Generates server load by taking connections from the java:DefaultDS datasource for a period
- Connection Pool Use
-
Generates server load by tieing up threads in the webserver connections pool for a period
- Heap Memory Pool Use
-
Generates server load by filling 50% of free heap memory for a period
- CPU Use
-
Generates server CPU load by initiating a tight loop in a thread
- Server Receive Traffic
-
Generates server traffic receipt load by POSTing a large byte array to the server once per second for a period
- Server Send Traffic
-
Generates server traffic send load by making a request once per second to which the server responds with a large byte array
- Request Count
-
Generates server load by making numerous requests, increasing the request count on the target server
- [1]
-
The demo’s "Datasource Use" load generation scenario requires the use of JBoss Application Server.
- [2]
-
For purposes of this chart, a session is considered "active" if a client thread will ever again send a request associated with the session. When client threads stop using a session, they can either send a request to invalidate it or just abandon it by no longer including its session cookie in requests. After a session is abandoned, it will not be reflected in the "Session Balancing" chart, but it will continue to exist on the JBossWeb/Tomcat/JBoss AS server until it is removed due to timeout.
- [3]
-
The default value for this field is controlled by the
mod_cluster.proxy.hostsystem property, or localhost if not set. Editing the run-demo.sh or run-demo.bat file to change the-Dmod_cluster.proxy.host=localhostpassed to java will allow you to avoid re-typing this value every time you launch the demo application. - [4]
-
The default value for this field is controlled by the
mod_cluster.proxy.portsystem property, or 8000 if not set. Editing the run-demo.sh or run-demo.bat file to change the-Dmod_cluster.proxy.port=8000passed to java will allow you to avoid re-typing this value every time you launch the demo application.
7. FAQ
7.1. What is Advertise?
Advertise allows autodiscovery of httpd proxies by the cluster nodes. It is done by sending multicast messages from httpd to the cluster. The httpd specialized module: mod_advertise sends UDP message on a multicast group, both mod_advertise and the cluster listener joined the multicast group and the cluster receives the messages.
Example of a mod_advertise message:
HTTP/1.0 200 OK
Date: Wed, 08 Apr 2009 12:26:32 GMT
Sequence: 16
Digest: f2d5f806a53effa6c67973d2ddcdd233
Server: 1b60092e-76f3-49fd-9f99-a51c69c89e2d
X-Manager-Address: 127.0.0.1:8090
X-Manager-Url: /bla
X-Manager-Protocol: http
X-Manager-Host: 10.33.144.3
The X-Manager-Address header value is used by the cluster logic to send information about the cluster to the proxy. It is the IP and port of the VirtualHost where mod_advertise is configured or URL parameter of the ServerAdvertise directive.
See mod_advertise configuration.
7.2. What to do if I don’t want to use Advertise (UDP multicast)
In the VirtualHost receiving the MCMP of httpd.conf don’t use any Advertise directive or set explicitly:
ServerAdvertise OffOn the worker side, add the addresses and ports of the VirtualHost receiving MCMP (having EnableMCMPReceive) to the proxyList
property and set advertise to false, for example:
7.2.1. JBoss AS 5
<property name="proxyList">10.33.144.1:8090,10.33.144.2:8090</property>
<property name="advertise">false</property>
in jboss-as/server/production/deploy/mod-cluster.sar/META-INF/mod-cluster-jboss-beans.xml.
7.2.2. Tomcat 6/7/8 and JBossWeb
In server.xml, change
<Listener className="org.jboss.modcluster.container.catalina.standalone.ModClusterListener" />to
<Listener className="org.jboss.modcluster.container.catalina.standalone.ModClusterListener"
          advertise="false"
          proxyList="10.33.144.1:8090,10.33.144.2:8090"
/>
7.3. It is not working, what should I do?
Please, at first, go through the following check-list. Set Apache HTTP Server’s LogLevel debug in httpd.conf and
read the error_log. If you get stuck, you are welcome to
-
post on JBoss user forums
-
join JBoss mailing list and and drop us a line
7.3.1. There is no error in the error_log
That happens when Advertise is not working and no Proxy List is configured: The worker nodes do not get the from Apache HTTP Server.
-
Check that the modules are loaded and Advertise is started. In httpd.conf activate extended information display, add:
AllowDisplay OnWhen accessing the mod_cluster-manager console you should get something like: TODO: Image. If not, go to the Minimal Example and add the missing directive(s).
-
Check that Advertise message are received on the cluster node. A Java utility could be used to check Advertise. It is in the mod_proxy_cluster repository and can be compiled using javac. The output should be something like:
[jfclere@jfcpc java]$ java Advertize 224.0.1.105 23364
ready waiting…
received: HTTP/1.0 200 OK
Date: Mon, 28 Jun 2010 07:30:31 GMT
Sequence: 1
Digest: df8a4321fa99e5098174634f2fe2f87c
Server: 1403c3be-837a-4e76-85b1-9dfe5ddb4378
X-Manager-Address: test.example.com:8090
X-Manager-Url: /1403c3be-837a-4e76-85b1-9dfe5ddb4378
X-Manager-Protocol: http
X-Manager-Host: test.example.com-
If there are no Advertise messages, check the firewall. Advertise uses UDP port 23364 and multicast address 224.0.1.105 by default. Furthermore, do not bind to localhost/127.0.0.1, use a non-localhost IP address for your balancer – workers UDP advertisement test.
-
If you are unable to get the Advertisement to work, try it first without it, with a static configuration without UDP multicast).
7.3.2. Error in server.log or catalina.out
-
IO error sending command: Check the firewall and error_log, if there is nothing in the error_log then it is a firewall problem. If you have something like:
INFO [DefaultMCMPHandler] IO error sending command INFO to proxy localhost/10.33.144.3:8090it means that the worker was unable to contact the balancer. Keep in mind that the communication is bidirectional.
You can use telnet hostname/address port to check that it is OK, e.g.:
[user@host ~]$ telnet 10.33.144.3 8090
Trying 10.33.144.3…
Connected to host.
Escape character is '^]'.
GET /
<html><body><h1>It works!</h1></body></html>Connection closed by foreign host.
Check that the address and port are the expected ones you may use ServerAdvertise directive in you mod_cluster httpd configuration:
ServerAdvertise On http://localhost:80907.3.3. Error in error_log
-
client denied by server configuration: The directory in the VirtualHost is not allowed for the client. If you have something like:
[error] [client 10.33.144.3] client denied by server configuration: /You need to have something like the undermentioned authentication configured in the EnableMCMPReceive marked VirtualHost:
<Location />
    Require ip 10.33.144.3
</Location>
7.4. I started mod_cluster and it looks like it’s using only one of the workers?
One must give the system some time, in matter of the amount of new sessions created, to settle and pick other nodes. An example from an actual environment: You have 3 nodes with the following Load values:
Node jboss-6,   Load: 20
Node jboss-6-2, Load: 90
Node jboss-6-3, Load:  1
Yes, this means that jboss-6-2 is almost not loaded at all whereas jboss-6-3 is desperately overloaded. Now, I send 1001 requests, each representing a new session (the client is forgetting cookies). The distribution of the requests will be as follows:
Node jboss-6   served 181 requests
Node jboss-6-2 served 811 requests
Node jboss-6-3 served   9 requests
So, generally, yes, the least loaded box received by far the greatest amount of requests, but it did not receive them all. Furthermore, and this concerns your case, for some time from the start, it was jboss-6 who was getting requests.
This whole magic is in place in order to prevent congestion.
7.5. Keep seeing "HTTP/1.1 501 Method Not Implemented"
The EnableMCMPReceive must be configured in the VirtualHost where the MCMP elements are configured in the Apache httpd configuration.
See minimal example above.
7.6. Redirect is not working (Tomcat, JBossWeb):
When using http/https instead of AJP, proxyname, proxyhost and redirect must be configured in the Tomcat Connector. Something like:
<Connector port="8080"
           protocol="HTTP/1.1"
           connectionTimeout="20000"
           proxyName="httpd_host_name"
           proxyPort="8000"
           redirectPort="443"
/>
7.7. I have more than one Tomcat/JBossWeb Connector
mod_cluster tries to use the first AJP connector configured. If there
is not any AJP connector, it uses the http or https that has the biggest
maxthreads value. That is maxThreads in Tomcat 6/7/8 and JBoss AS 5/6:
<Connector port="8080" protocol="HTTP/1.1" maxThreads="201"/>Or max-connections in JBoss AS 7: (32 * processor + 1 for native and 512 * processor + 1 for JIO).
In Web subsystem:
<connector name="http" protocol="HTTP/1.1" scheme="http" socket-binding="http" max-connections="513"/>7.8. Google Chrome does not display /mod_cluster-manager page
When using ports such as 6666 for the virtual host and using Google Chrome with mod_cluster-manager, the page is not displayed and the following error is displayed instead:
Error 312 (net::ERR_UNSAFE_PORT): Unknown error.you can change the port of the VirtualHost to 8090 or any value chrome that is not considered unsafe by the browser, or start parameters for Google Chrome:
-–explicitly-allowed-ports=66667.9. How do I use mod_cluster with SELinux?
mod_cluster needs to open port and create shared memory and files, therefore some permissions have to be added, you need to configure something like:
policy_module(mod_cluster, 1.0)

require {
 type unconfined_java_t;
 type httpd_log_t;
 type httpd_t;
 type http_port_t;
 class udp_socket node_bind;
 class file write;
}

# ============= httpd_t ==============

allow httpd_t httpd_log_t:file write;
corenet_tcp_bind_generic_port(httpd_t)
corenet_tcp_bind_soundd_port(httpd_t)
corenet_udp_bind_generic_port(httpd_t)
corenet_udp_bind_http_port(httpd_t)

# ============= unconfined_java_t ==============

allow unconfined_java_t http_port_t:udp_socket node_bind;
Put the above in a file for example mod_cluster.te and generate the
mod_cluster.pp file (for example in Fedora 16):
[jfclere@jfcpc docs]$ make -f /usr/share/selinux/devel/Makefile
Compiling targeted mod_cluster module
/usr/bin/checkmodule: loading policy configuration from tmp/mod_cluster.tmp
/usr/bin/checkmodule: policy configuration loaded
/usr/bin/checkmodule: writing binary representation (version 14) to tmp/mod_cluster.mod
Creating targeted mod_cluster.pp policy package
rm tmp/mod_cluster.mod.fc tmp/mod_cluster.mod
The mod_cluster.pp file should be proceeded by semodule as root:
[root@jfcpc docs]# semodule -i mod_cluster.pp
[root@jfcpc docs]#
Alternatively, one may use semanage and add ports and paths labels manually.
7.10. How do I change STATUS message frequency?
In WildFly, this behavior is configurable in the mod_cluster subsystem. Run the following CLI command to adjust to 20 seconds in this example:
/subsystem=modcluster/proxy=default:write-attribute(name=status-interval, value=20)In Tomcat, you need to use system property to modify this behavior.
Setting org.jboss.modcluster.container.catalina.status-frequency (default: 1) makes worker to send STATUS MCMP messages only 1/n periodic event.
The events occur every backgroundProcessorDelay (default 10 seconds).
7.11. How can I debug requests in Undertow?
Undertow by default provides a RequestDumpingHandler from the main io.undertow.core module.
Use the following CLI script to configure Undertow to log the request to the log:
batch
/subsystem=undertow/configuration=filter/custom-filter=request-dumping-filter:add(class-name=io.undertow.server.handlers.RequestDumpingHandler, module=io.undertow.core)
/subsystem=undertow/server=default-server/host=default-host/filter-ref=request-dumping-filter:add
run-batch
reload
8. Migration
8.1. Migration from mod_jk
The mod_cluster only support Apache httpd, there are no plans to support IIS nor IPlanet.
The migration from mod_jk to mod_cluster is not very complex. Only very few worker properties can’t be mapped to mod_cluster parameters.
Here is the table of worker properties and how to transfer them in the ClusterListener parameters.
| mod_jk worker property | ClusterListener parameter | Remarks |
|---|---|---|
host |
- |
It is read from the <Connector/> Address information |
port |
- |
It is read from the <Connector/> Port information |
type |
- |
It is read from the <Connector/> Protocol information |
route |
- |
It is read from the <Engine/> JVMRoute information |
domain |
domain |
That is not supported in this version |
redirect |
- |
The nodes with loadfactor = 0 are standby nodes they will be used no other nodes are available |
socket_timeout |
nodeTimeout |
Default 10 seconds |
socket_keepalive |
- |
KEEP_ALIVE os is always on in mod_cluster |
connection_pool_size |
- |
The max size is calculated to be AP_MPMQ_MAX_THREADS+1 (max) |
connection_pool_minsize |
smax |
The default is max |
connection_pool_timeout |
ttl |
Time to live when over smax connections. The default is 60 seconds |
- |
workerTimeout |
Max time to wait for a free worker default 1 second |
retries |
maxAttempts |
Max retries before returning an error Default: 3 |
recovery_options |
- |
mod_cluster behave like mod_jk with value 7 |
fail_on_status |
- |
Not supported |
max_packet_size |
iobuffersize/receivebuffersize |
Not supported in this version. Use ProxyIOBufferSize |
max_reply_timeouts |
- |
Not supported |
recovery_time |
- |
The ClusterListener will tell (via a STATUS message) mod_cluster that the node is up again |
activation |
- |
mod_cluster receives this information via ENABLE/DISABLE/STOP messages |
distance |
- |
mod_cluster handles this via the loadfactor logic |
mount |
- |
The context "mounted" automatically via the ENABLE-APP messages. ProxyPass could be used too |
secret |
- |
Not supported |
connect_timeout |
- |
Not supported. Use ProxyTimeout or server TimeOut (Default 300 seconds) |
prepost_timeout |
ping |
Default 10 seconds |
reply_timeout |
- |
Not supported. Use ProxyTimeout or server TimeOut? directive (Default 300 seconds) |
8.2. Migration from mod_proxy
As mod_cluster is a sophisticated balancer, migration from mod_proxy to mod_cluster is straightforward.
The mod_cluster replaces a reverse proxy with load-balancing.
A reverse proxy is configured such as:
ProxyRequests Off

<Proxy *>
  Order deny,allow
  Allow from all
</Proxy>

ProxyPass /foo http://foo.example.com/bar
ProxyPassReverse /foo http://foo.example.com/bar
All the general proxy parameters could be used in mod_cluster they work like in mod_proxy,
only the balancers and the workers definitions are slightly different.
8.2.1. Workers
| mod_proxy Parameter | ClusterListener parameter | Note |
|---|---|---|
min |
- |
Not supported in this version |
max |
- |
mod_cluster uses mod_proxy default value |
smax |
smax |
Same as mod_proxy |
ttl |
ttl |
Same as mod_proxy |
acquire |
workerTimeout |
Same as mod_proxy acquire but in seconds |
disablereuse |
- |
mod_cluster will disable the node in case of error and the ClusterListener will for the reuse via the STATUS message |
flushPackets |
flushPackets |
Same as mod_proxy |
flushwait |
flushwait |
Same as mod_proxy |
keepalive |
- |
Always on: OS KEEP_ALIVE is always used. Use connectionTimeout in the <Connector> if needed |
lbset |
- |
Not supported |
ping |
ping |
Same as mod_proxy Default value 10 seconds |
lbfactor |
- |
The load factor is received by mod_cluster from a calculated value in the ClusterListener |
redirect |
- |
Not supported lbfactor sent to 0 makes a standby node |
retry |
- |
ClusterListener will test when the node is back online |
route |
JVMRoute |
In fact JBossWEB via the JVMRoute in the Engine will add it |
status |
- |
mod_cluster has a finer status handling: by context via the ENABLE/STOP/DISABLE/REMOVE application messages. hot-standby is done by lbfactor = 0 and Error by lbfactor = 1 both values are sent in STATUS message by the ClusterListener |
timeout |
nodeTimeout |
Default wait forever (http://httpd.apache.org/docs/2.4/mod/mod_proxy.html is wrong there) |
addressttl |
- |
Default 60 seconds |
8.2.2. Balancers
| mod_proxy Parameter | ClusterListener parameter | Note |
|---|---|---|
lbmethod |
- |
There is only one load balancing method in mod_cluster "cluster_byrequests" |
maxattempts |
maxAttempts |
Default 1 |
nofailover |
stickySessionForce |
Same as in mod_proxy |
stickysession |
StickySessionCookie/StickySessionPath |
The 2 parameters in the ClusterListener are combined in one that behaves like in mod_proxy |
timeout |
workerTimeout |
Default 1 seconds |
9. Developer Resources
For more technical and detailed information, such as the ModCluster Management Protocol (MCMP) definition, visit Developer Resources page.